How to create custom photobooth frames in Canva using Image to Frame
Discover how to create custom photobooth frames in Canva with the Image to Frame app. This guide covers background removal, image conversion, and design tips for unique event-ready frames.
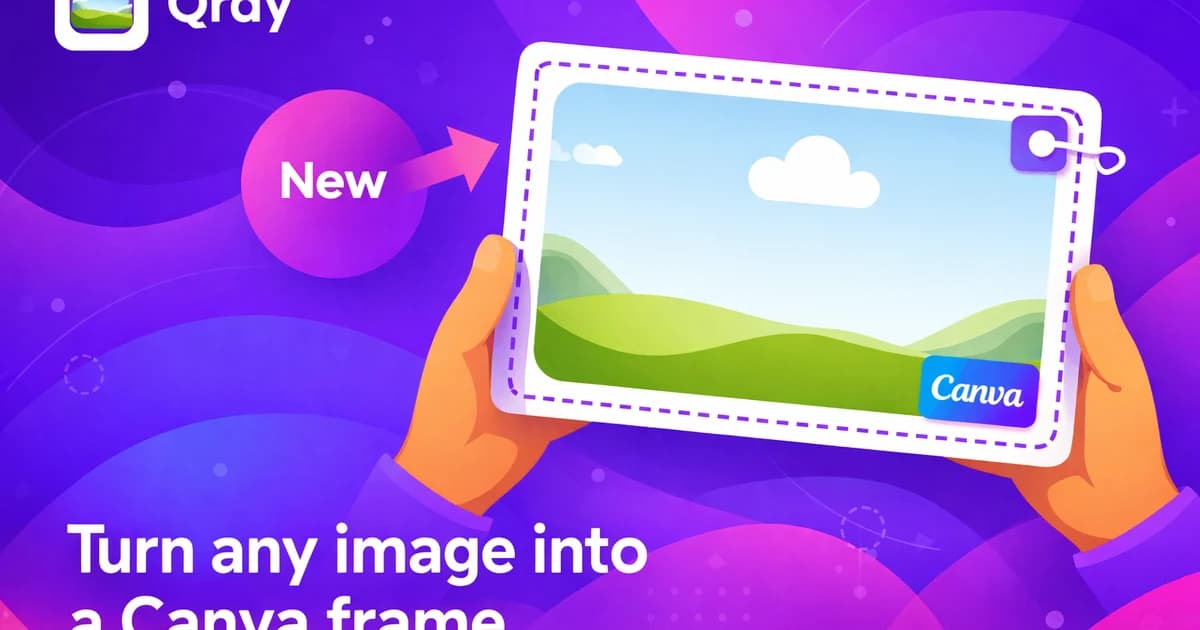
Want to create custom photobooth frames in Canva? Image to Frame is the easiest way to turn any image into a genuine Canva frame. In minutes, you can design, convert, and use unique frames for any event—no complicated steps or manual tracing required.
How to create custom photobooth frames in Canva with Image to Frame #
To create custom photobooth frames in Canva, use the Image to Frame app to convert your prepared image into a working Canva frame. This process ensures your frame matches your event’s theme and saves time compared to manual techniques.
Image to Frame lets you transform any PNG, SVG, or JPG with a transparent background into an interactive Canva frame. Just upload your frame image, hit convert, and the frame appears in your design, ready for photos or videos. Removing the background before conversion is crucial—otherwise, your frame will be a plain rectangle.
With this workflow, you can create frames for weddings, birthdays, brand events, or any celebration. For more tips on designing with custom frames, check out our custom frames tips.
Why use custom photobooth frames? #
Custom frames make your event stand out. They add a personal touch, reinforce your branding, and give guests a fun way to capture memories. Whether it’s a wedding monogram or a themed border, custom frames help your photos look polished and memorable.
Benefits of custom frames for events
- Personalize every photo with your event’s theme
- Encourage guest interaction and sharing
- Instantly elevate the look of your photo booth
Types of photobooth frames you can create #
- Classic rectangle or square frames
- Themed frames for holidays or special occasions
- Frames featuring event logos or mascots
- Fun shapes like hearts, stars, or circles
Preparing your photobooth frame image for Canva #
Start by choosing a frame image that fits your event’s theme. The best results come from high-resolution images with clear, defined edges and no background. Removing the background ensures that your Canva frame will match the exact shape of your original image.
You can use Canva’s Background Remover (Pro feature) or any background removal tool to erase unwanted areas. A transparent background is essential—otherwise, Image to Frame will generate a rectangle instead of your intended shape.
Ideal formats include PNG, SVG, or JPG (with transparency). Double-check your image before uploading to ensure the edges are clean and the file isn’t pixelated.
Image prep workflow #
Here’s the prep workflow:
- Choose or design your frame image
- Remove the background so only the frame outline remains
- Export as PNG, SVG, or JPG with transparency
- Ensure high resolution and clear edges for best results
Common mistakes when preparing images
- Forgetting to remove all background areas
- Using low-resolution or blurry images
- Saving in a format without transparency support
Tools and tips for background removal #
- Use Canva’s Background Remover for quick edits
- Try free online tools for PNG transparency
- Zoom in to check for stray pixels around the frame
Learn more about background removal in our remove background for frames Canva guide.
Step-by-step tutorial: converting your image into a Canva frame #
Turning your image into a Canva frame with Image to Frame is a simple, repeatable process. Here’s how to do it:
- Open Canva and launch Image to Frame.
- Upload your prepared frame image (PNG, SVG, or JPG with transparency).
- Click the convert button. Image to Frame processes your image and instantly creates a Canva frame.
- Check the frame shape. If your frame matches your image’s outline, you’re ready to use it. If it appears as a rectangle, return to your image and remove any lingering background.
- Drag the new frame into your photobooth design. Add photos or videos—Canva will snap them into your custom frame.
Troubleshooting: frame not showing the correct shape? #
If your frame appears as a rectangle or doesn’t match the intended outline, review your source image for stray pixels or areas that aren’t fully transparent. Clean up the edges, re-export, and try again.
Quick fixes for common conversion issues
- Double-check transparency before uploading
- Zoom in on edges to spot leftover background
- Try exporting in a different supported format
Tips for faster conversion #
- Prepare multiple images in advance for batch conversion
- Keep original files organized for quick edits
- Test your frame with different photos to ensure versatility
This method is much faster and more reliable than piecing together frames manually. For a visual walkthrough, see our custom frames tutorial.

Tips for designing unique photobooth frames in Canva #
Designing standout photobooth frames starts with creative choices. Pick colors and patterns that match your event’s vibe—wedding, birthday, corporate, or theme party. Use images with bold, clear outlines to make your frame pop on camera.
Creative ideas for custom frames #
- Frames in unusual shapes (hearts, stars, logos)
- Decorative edge details or themed icons
- Layering your frame with text or clipart in Canva
- Adjusting frame size and aspect ratio to fit your photobooth template
Testing your frame design #
Test out several designs to find the one that energizes your event. Place your frame over sample photos in Canva to see how it looks in action. Adjust colors, thickness, or add extra elements until you’re satisfied.
Ways to make your frame stand out
- Use contrasting colors for the frame and background
- Add subtle drop shadows for depth
- Incorporate event branding or dates
Common design pitfalls to avoid #
- Overcrowding the frame with too many details
- Using colors that clash with your event’s palette
- Making the frame too thick, which covers too much of the photo
Want more inspiration? Read our photobooth template design tips.
Workflow guide: from frame image design to Canva integration #
A smooth workflow helps you create and reuse photobooth frames efficiently. Here’s the recommended process:
- Design or select your frame image outside Canva
- Remove background so your frame has a transparent outline
- Convert with Image to Frame for a Canva-compatible frame
- Add the frame to your design and test with different images or videos
- Save and organize your frames in folders or labeled files for easy access
Organizing your custom frames #
Keeping a dedicated folder in Canva for your custom frames means you can quickly reuse them for future projects or events. Regularly update your library with new frames to keep your event designs fresh.
Tips for efficient frame management
- Group frames by event type or style
- Use consistent file naming (e.g., "wedding-heart-frame.png")
- Periodically review and remove outdated designs
Advanced workflow tips #
- Create a spreadsheet to track frame designs and usage
- Add tags or notes in Canva for quick searching
- Share your custom frames with collaborators for faster team projects
Optimize your workflow with clear file naming and consistent organization. For more on managing frame projects, see our custom frames workflow.

Conclusion #
Custom photobooth frames in Canva are easy to create with Image to Frame. With a few simple steps—preparing your image, converting it, and organizing your designs—you can deliver unique, memorable event photos every time. Try out different shapes and styles, and keep your frame library ready for any occasion.
FAQ about creating photobooth frames in Canva with Image to Frame #
What should I do if my frame shows up as a rectangle in Canva?
This usually means your image still has a background. Double-check and use a background removal tool—frames only take the outline of transparent images.
Which image formats are supported by Image to Frame?
Image to Frame works with PNG, SVG, or JPG files. Make sure your file has a transparent background for best results.
How do I choose the best image for a photobooth frame?
Pick high-resolution images with clear, bold outlines. Avoid blurry or pixelated edges, and make sure the background is fully removed.
Can I reuse frames I made with Image to Frame in other designs?
Yes, once you create a frame, save it in your Canva folders. You can drag it into any design or duplicate it for future events.
Why use Image to Frame instead of building frames manually in Canva?
Image to Frame is much faster and more precise. You get a frame that matches your custom shape exactly, saving time and unlocking creative possibilities.
For more answers, see our custom frames FAQ.
Ready to try Image to Frame? #
Image to Frame là Canva app của QRdy — chuyển PNG/SVG/JPG thành frame Canva hợp lệ, nhớ xoá nền trước để frame bám đúng outline ảnh, rồi đổ ảnh/video vào trong.

Frequently asked questions
This usually means your image still has a background. Double-check and use a background removal tool—frames only take the outline of transparent images.
Image to Frame works with PNG, SVG, or JPG files. Make sure your file has a transparent background for best results.
Pick high-resolution images with clear, bold outlines. Avoid blurry or pixelated edges, and make sure the background is fully removed.
Yes, once you create a frame, save it in your Canva folders. You can drag it into any design or duplicate it for future events.
Image to Frame is much faster and more precise. You get a frame that matches your custom shape exactly, saving time and unlocking creative possibilities.
More from QRdy Blog
How to convert images into custom Canva frames with Image to Frame
Discover how to turn your PNG, JPG, or SVG images into custom Canva frames with Qrdy's Image to Frame app. Follow our step-by-step guide and tips for perfect frames.

How to create dynamic QR codes in Canva using Qrdy Dynamic QR
Discover how to create dynamic QR codes in Canva using Qrdy Dynamic QR. Update your QR code destination anytime after printing and track scans effortlessly.
How to quickly create a 2024 wall calendar in Canva with Calendar Maker
Discover how to make a 2024 wall calendar in Canva quickly using Calendar Maker. Automate date entry, customize styles, and prepare your calendar for print.